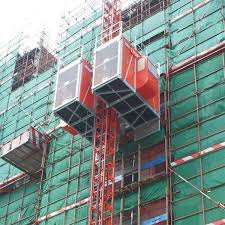
Hoist is a Rack and Pinion lift that is useful on construction site for transportation of personnel and materials. It is installed and dismounted conveniently and can grow as high as the building grows in height. Hoist has reliable electrical and mechanical safety device. It is efficient and safe vertical transporting equipment.
Following tools shall be arranged before the installation work starts:
- Tower crane
- Flat bed Lorries
- Safety harnesses, Helmet
- Chain blocks, power tools as required
- Fire fighting and safety equipments i.e. Fire Extinguisher etc.
- Bolts and pins
- Anchor bolts
- Counter weight blocks
Preparation before Installation of Hoist
- Make sure that there is power supply on the erection place.
- Provide a power box specialized for the hoist and a switch for each cage. Fuse current see technical data.
- The distance between transformer substation and the main power of site should be no more than 30m. The Section of copper cable should be more than 25mm and be increased with the distance increased.
- Make sure that there is the lifting equipment and tools at the erection place.
- Make sure that the road and yard are prepared to receive and transport the hoist and its parts.
- Cast a foundation in’ accordance with instructions.
- Select the method for installation of tie-ins. Prepare the casting frame and fixing parts if necessary.
- Prepare the landing accessories such as bridges and railings according to the requirement’ of user. Landing door could be ordered from the factory.
Installation of Hoist Cage
- Sweep the surface of the foundation. (The foundation detail will be as per attached drawing)
- Installed foundation Metal, fixed the screw.
- Installed foundation mast, fixed the screw.
- Installed spring under the cage.
- Lift the cage and put it in position.
- Loose the electric motor brake.
Dismounting method: make note then dismount the two pins. Loose the two nuts parallel until the brake loose and the brake disc can ‘be rotated.
- Lift the driving-vehicle with the lifting equipment.
- Locate the driving-vehicle precisely from top of the mast section.
- Adjust driving-vehicle and the cage with the ear board in same line, then insert a transmission pin, then fix it with split pin.( If it is: a lift installed with overload device insert a sensor pin,. then let the limit slot on the top side, firm it with board).
- Replace the brake.
- Measure the uprightness of the mast with a water lever or plumb line. Ensure ‘ the straightness of each vertical pipe of mast is less than 1/1500 in two directions.
- Adjust the hoist mast by putting solid steel washers between the frame and the foundation.
- When the mast is absolutely straight, tighten the screws.
- Adjust the straightness of the enclosure front gable with a water level or plumb line. Ensure the straightness of the enclosure front gable is less than 1/1000 in two directions.
- Install the safety railing on the cage roof.
- Adjust the lock of door.
Installation of Twin Cage Hoist
- Install the left part of the hoist according to the above instructions.
- Connect the right part of enclosure by bolts.
- Adjust the straightness of the enclosure front gable. Fasten the screws to the foundation
- Loose the electric motor brake.
Dismounting method: make note then dismount the two pins. Loose the two nuts parallel until the brake loose and the brake disc can be rotated.
- Lift the cage with lifting device.
- Put down the cage to the exact position.
- Replace the brake.
Adjustment After the Installation
- Remove the wooden beams or bots used during transportation.
- Make sure that the play for pinion in engagement with rack is 0.2mm – 0.5mm.
- Make sure that the interval between the back of the rack and the guide rollers is 0.5mm.
- Make sure that the interval between each roller and the mast pipe is 0.5mm.
- All doors should be opened and closed easily.
- Install the buffer spring.
Installation of Lifting Device
Put the lifting device into the position pin the cage roof, (You should connect power for electric lifting device).
Erection of the Mast
- Clean the two ends of mast vertical pipe and rack pins. Lubricate them.
- Open a section of the safety railing. Wind down the hook to attach the mast’s hanger.
- Attach a mast section with mast’s hanger.
- Lift the mast section up to the cage roof by winch.
- Close the safety railing. Drive the cage up as close to the mast top as possible. The distance to the top of the mast is about 300mm. 6.Lift up a mast section with the lifting device. Put it down into the vertical pipe and the pin holes of the rack. Tighten the bolts.
- Release the hook and turn round the lifting device to tighten all bolts.
- Continue as above until the final mast height has been reached. Do not forget the tie-in. Measure the straightness of the erected mast sections.
Installation of Tie-in Type III
- Install the brackets on the mast and tighten them with screws.
- Install the wall bracket.
- Install the support frame and tighten screws. Start the hoist slowly and make sure that the cage and counterweight do not touch the tie-in.
Installation of Counterweight
- After installation of cage and enclosure, a .counterweight should be put in position before erecting the mast.
- Fit the counterweight buffers at ground landing.
- Put the counterweight to counterweight guide rail with lifting device.
- Check the interval between the guide rollers and the guide rail. Make sure that the interval is 0.5mm and all rollers rotate easily.
Installation of Top wheel and Rope
- Install the top wheel for the hoist with counterweight when the mast has been erected up to the desired height. Attach the rope to the counterweight.
- Lift the top wheel, wire attachment and rope bracket up to the cage roof. Prepare the screws and rope locks.
- Fit the rope bracket on the cage.
- Drive the cage up and stop it 1000 mm under the mast top, Fit the top wheel in the mast top and fasten it with screws.
- Install the wire attachment.
- Pull the rope around the wire attachment and the top wheel and attach it to the counterweight on ground by means of the thimble.
- Attach another end of the rope to the wire attachment by means of U-bolt grip of thimble shall be secured on stressing place of wire rope. Thimbles cannot be set up replaceable. The least amount of thimble which each join place require is recommended follows form.
- The distance between thimbles equal six to seven times diameter of the wire rope.
Installation of Cable Guiding Device
- Suspend the cable drum by means of the erection crane above the cable basket.
- Un wrap the cable for about 2.5m for connection to the power box.
- Pull the cable through the bottom of the basket and further to the power box, but do not connect it yet!
- Put the cable into the cable basket, layer by layer.
- Mount a socket in the cable end and plug it into the outlet at the cable support arm.
- Connect the cable to the power box and run the hoist to check how the cable reels/unreels itself.
- Install the cable guides as the mast extension progresses.
- Adjust the positions of the cable guides and their support to secure the cable in the center of “U”-shape.
Installation of Landing Door
- Each landing station should be equipped with landing door or landing bar. Install landing doors at platforms.
- Electrical interlocked switch should be established in control loop in power box of enc1ousure.
- If the User does not adopt landing door device, the user may setup remaining landing bar by them. Remaining landing bar should interlock with electricity or mechanics of cage.
Pre Operation Procedure:
- All erection will be as per erection manual and all relevant works will be carried out under Supervision of qualified hoist erection supervisor.
- Plant area around the foundation of hoist will be kept cleared and cleaned for the smooth and safe lifting Operation during work progress.
- Connect the control cable from switchgear cabinet to control panel, and insert the main plug at the site junction box.
- Electrical connection for the hoist is made and necessary fire fighting (Cylinders) and safety equipment are installed in the cabin.
- Ensure that load indicator and other systems are functioning properly.
Discover more from Method Statement HQ
Subscribe to get the latest posts sent to your email.